This recipe has been a while in the making. While I can make fish cutlets pretty well it doesn't do us much good because my kids are vegetarian and it is only my husband who is a pescatarian. Cutlets are a popular Sri Lankan short eat, but they are also served with rice and curry unlike other short eats. Like all Sri Lankan short eats they take time to prepare and are best eaten piping hot.
Sri Lankan's have all kinds of myths as to why cutlets pop. I've been given years of advise about how to make the perfect cutlet. I've followed all instructions but none of them work consistently. But fortunately, after around 20 years, I finally realised why these snippets of advice actually work and why cutlets pop.
Cutlets pop because there is too much moisture in the cutlet and/or the oil is not the right temperature. [This is exactly the same reason why my falafel used to pop (passed tense since I've perfected my falafel!)] And it is as simple as that. Reduce the moisture, use a thermometer and you too can make the perfect cutlet. So you might ask "then why did it take so long to perfect this recipe?" The answer is a simple combination of "it's not so easy to reduce the moisture with just vegetables" and "it's hard to find the time when you have a full time job and two kids".
Preparation time: 2.5 hours; makes 24
Ingredients:
| 500 g | Floury potatoes, peeled |
| 250 g | Carrots, peeled |
| 1 tbsp. | Butter |
| 100 g | Leeks (tender green part) |
| 1 | Garlic clove (small), minced or pulped |
| 1/4 tsp. | Bullion powder (or bullion cube) |
| 1 tsp. | Salt |
| 1/4 tsp. | Pepper |
| 1/4 cup | Breadcrumbs |
| 1 l | Oil - for deep frying |
| 1 lrg | Egg |
| 1 tbsp. | Flour |
| 1/2 cup + 2 tbsp. | Breadcrumbs |
Method:
Make sure you use "floury" potatoes. In SL this would be the yellow ones. Unfortunately I don't personally know which type these are in other countries. According to the BBC Food Desiree, Estima, King Edward and Maris Piper are floury varieties. In Germany they are sold as "floury cooking" (mehlig kochende) potatoes! If you use what German's call "firmly cooking" (festkochende) the potatoes will not be as easy to mash and seem to retain too much water because they have to cook longer to become mashable.
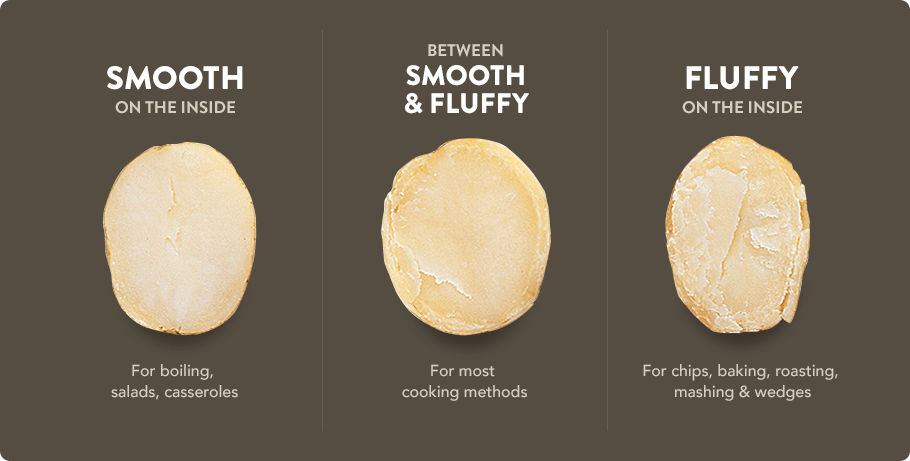 |
In case you need it (maybe floury=fluffy?)
|
Cut the potatoes roughly into large dice (~2 cm cube) and add them to boiling water. Cook for around 8 minutes or until soft and mashable. Don't cook them so that they disintegrate. You want some body to your cutlets. This is what distinguishes them from croquettes. Drain the water and allow the potatoes to cool.
While your potatoes are cooking prepare your carrots. I've struggled for a long while trying to figure out how to integrate carrots into my cutlets. I don't know why but I just feel like carrots are the right thing to have in there. What I've found with carrots is that they don't smash very well (unless you put them in a food processor and turn them into puree) and if you boil them forever they absorb too much water. So to incorporate them into my recipe I had to figure out how to cook them and get rid of some of the water. I finally accomplished this by grating them and then steaming them in a cheesecloth.
I like to use organic carrots because they tend to taste of something. I mean, they actually taste of carrots! You should grate the carrots on a coarse setting (the coarse setting of any "old" grater should be fine). Then line your steamer with cheesecloth and place the grated carrots in the cheesecloth. Steam them in this way for about x minutes or until they are soft. How long you actually have to steam them will depend on how coarsely you grated them. When you remove the carrots from the steamer pick them up in the cheesecloth and leave them in a colander to cool.
Leeks are another must have in cutlets. However, leeks cannot be mashed. So apparently the trick is to fry them in butter until they are soft else they will cause your cutlets to pop. I'm actually extrapolating from advice I have been given about onions! Use the leafy part of your leeks. If you are in SL or ever have been marketing in SL you will know that Sri Lankan leeks have way more green top than white bottom. In Germany it is completely the opposite. My theory is that Germans just leave their leeks in the ground for so long that the green tops are too hard to be eaten and thus have to be trashed. I personally cannot buy leeks with soft enough leaves that they could be used in a cutlet. But I'm hardcore and decided this year was the year for cutlets so I planted my own leeks. And they do not have a thick white bottom AND they have lots of nice soft green leaves (at least now they do!). If you cannot find leeks with soft leaves you can substitute with green onions (scallions, spring onions, whatever you want to call them). And if you are not in SL you know exactly what all these things are!
 |
| Leeks straight from my garden |
Chop your leeks finely. Add the butter to a pan and pan fry the leeks (scallions, green onions, spring onions,...) together with the garlic. If you want to add onions you can also fry them in the butter. Just make sure you dice them really, really small. If you over fry any of these ingredients they will become hard. You don't want this. So very lightly fry them and as soon as they are soft remove them from the heat.
By now your potatoes are cool enough. You can smash them with the back of a fork or use your hands. Don't use a potato masher because then you will have croquettes and (just a reminder) we are not making croquettes. Move over to the carrots. Pick them up in the cheesecloth and squeeze some of the water out. Don't squeeze all the water out. Just give it a light squeeze. Too much squeeze will make the carrots very dry and not very tasty.
Add the carrots to the potatoes along with the leeks/garlic, salt & pepper, bullion powder, breadcrumbs and mix all the ingredients together.
Now we come to forming the balls. It's very easy and unlike popular belief, they will not pop if they are not perfectly spherical. How big your balls are depends on, well, many things. But mainly it is a matter of taste. I like smaller balls. About a tablespoon full or something that fits neatly in the palm of my hand. So take a tablespoon of mixture and roll it into a nice tight ball. The first time you attempt this recipe you should make all the balls first and line them up on a baking tray (or a large plate, chopping board, etc.). Next, in a bowl, whisk together a tablespoon of flour and one egg. Pour the remaining breadcrumbs into another bowl.
The next part some people find very messy and end up getting egg into their breadcrumbs and loads of stuff sticking to their hands. To avoid this use my two hand method.
Take a cutlet (in your right hand) and drop it into the breadcrumbs. Use your left hand to pour some breadcrumbs over it. Once the surface is no longer damp pick it up in your left hand and squeeze it a bit so that the breadcrumbs stick and the cutlet becomes tighter. Dip a bit of this cutlet into the egg mixture and then move it to your right hand where you can roll it about so that the egg dampens all the surface. Then drop the cutlet back into the breadcrumbs, pour some breadcrumbs over it, pick it up in your left hand and put it back on the board until it is ready to be fried. So left hand dry, right hand wet. Of course you can switch the hands. Or if you are really lucky have someone else to do the dry/wet part.

Somewhere along the line you can heat up your oil. You need enough oil to deep fry. If you are using a deep fryer just follow the deep fryers instructions. I use a saucepan and fill it with 1 litre of sunflower oil. You can use whatever oil you like. Nothing can make a cutlet healthy! If you do not use a deep fryer make sure your pan is deep enough so that the oil is only half way up to avoid the oil from overflowing. Heat your oil to 350 Fahrenheit and fry your cutlets until they are golden brown. You should lower them into the hot oil to prevent splashing. I usually fry 3-4 at a time. If you put too many in the temperature of the oil will drop too much and you can only guess what happens then (yes, POP!). If your cutlets sink to the bottom and stay there (mine do) then the part touching the bottom of the pan will burn. So you need to figure out a way to prevent this from happening. I stick my skimmer mesh under them to keep them off the bottom.
 |
| (In case you are wondering what a "skimmer mesh" is) |
Drain on paper towels. Enjoy hot with ketchup, Sriracha sauce, or your favourite dip. Or serve them along side rice and curry. Check out my Sri Lankan curry recipes for rice and curry inspiration.

 You will need:


